


Several recommendations to note before attaching your deck boards
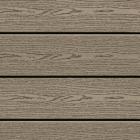
The upper surface of our deck boards, and also visible accessories, have a brushed finish to imitate the appearance of wood and increase grip.
The non-brushed surface must not be uppermost.
During installation, we recommend placing all boards so that the brushed finish is in the same direction, to reduce colour differences between adjacent boards.
• It is important to maintain lateral spacing of 5 mm between the boards (if clips are used, this spacing will be automatic). Pay attention to maintaining this gap if you are using exposed screws.
• It is important to maintain spacing of 5 mm between board lengths, i.e. at the ends. Check this spacing using the plastic expansion spacers provided with the clips.
• In addition to clips, boards less than 2 m in length must be attached to the joists at one end, using either screws or nails inserted from above.
• For short boards (< 80 cm), use at least three support and fixing points.
• The ends of each board must be fixed to a joist in order to eliminate any risk of deformation or breakage. Any overhang must not exceed 25 mm.
• Do not place screws within 25 mm of the edge of the board, to avoid splitting.
• Use of glue is strongly discouraged, for reasons of ventilation, expansion and contraction.
• Do not use too much torque when inserting screws. We recommend testing beforehand on a board off-cut.
• For the best results, we recommend beginning installation next to a building wall, and evening up the far ends using a circular saw and a ruler.